Last week I built this great demo with an Azure IoT Edge running on Industrial hardware, reading temperature, humidity, fan activity and led activity. But there was something missing…
I needed a simple dashboard to represent the values which were ingested by my Azure IoTHub and sent to an Azure Function.
Normally I build a basic website myself or I use tooling like PowerBI. It’s not that hard to get something sufficiently running for a demo.
But the last couple of weeks I was looking around for generic, off-the-shelf IoT Dashboards. And I had a couple of questions about their capabilities. What is on the market? What connectivity do they use? How many messages can I Ingest per time window? How do I configure the visual components? Etc.
I have reviewed a number of them and then I was checking out Adafruit IO.
This is what they see about themselves:
“Our simple client libraries work with the most popular devices such as the Adafruit Feather Huzzah, ESP8266, Raspberry Pi, Arduino, and more.”
I was triggered by the ‘more’ part. Does it also work with non-Adafruit devices? Because I know Adafruit from their DIY electronics shop, I was interested in what they are offering. And I was pleasantly surprised.
Let’s take a look at how we can integrate Adafruit IO in a generic demo with industrial hardware.
The demo
I have a demo based on the Advantech EIS-DK10 which contains an ARK pc, a Wise 4012 IO Module, a fan and a LED.
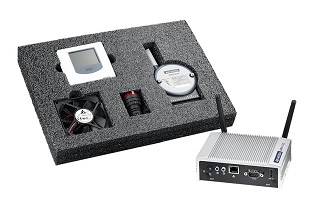
By default, it already contains a complete Edge example (built by Advantech on Windows 7 embedded) and it even connects to Azure. But I wanted to use Azure IoT Edge so I just put Ubuntu on the Ark PC and I use Modbus TCP to read the humidity and temperature values and I can activate the fan and/or led using Modbus TCP too.
The demo looks like this:
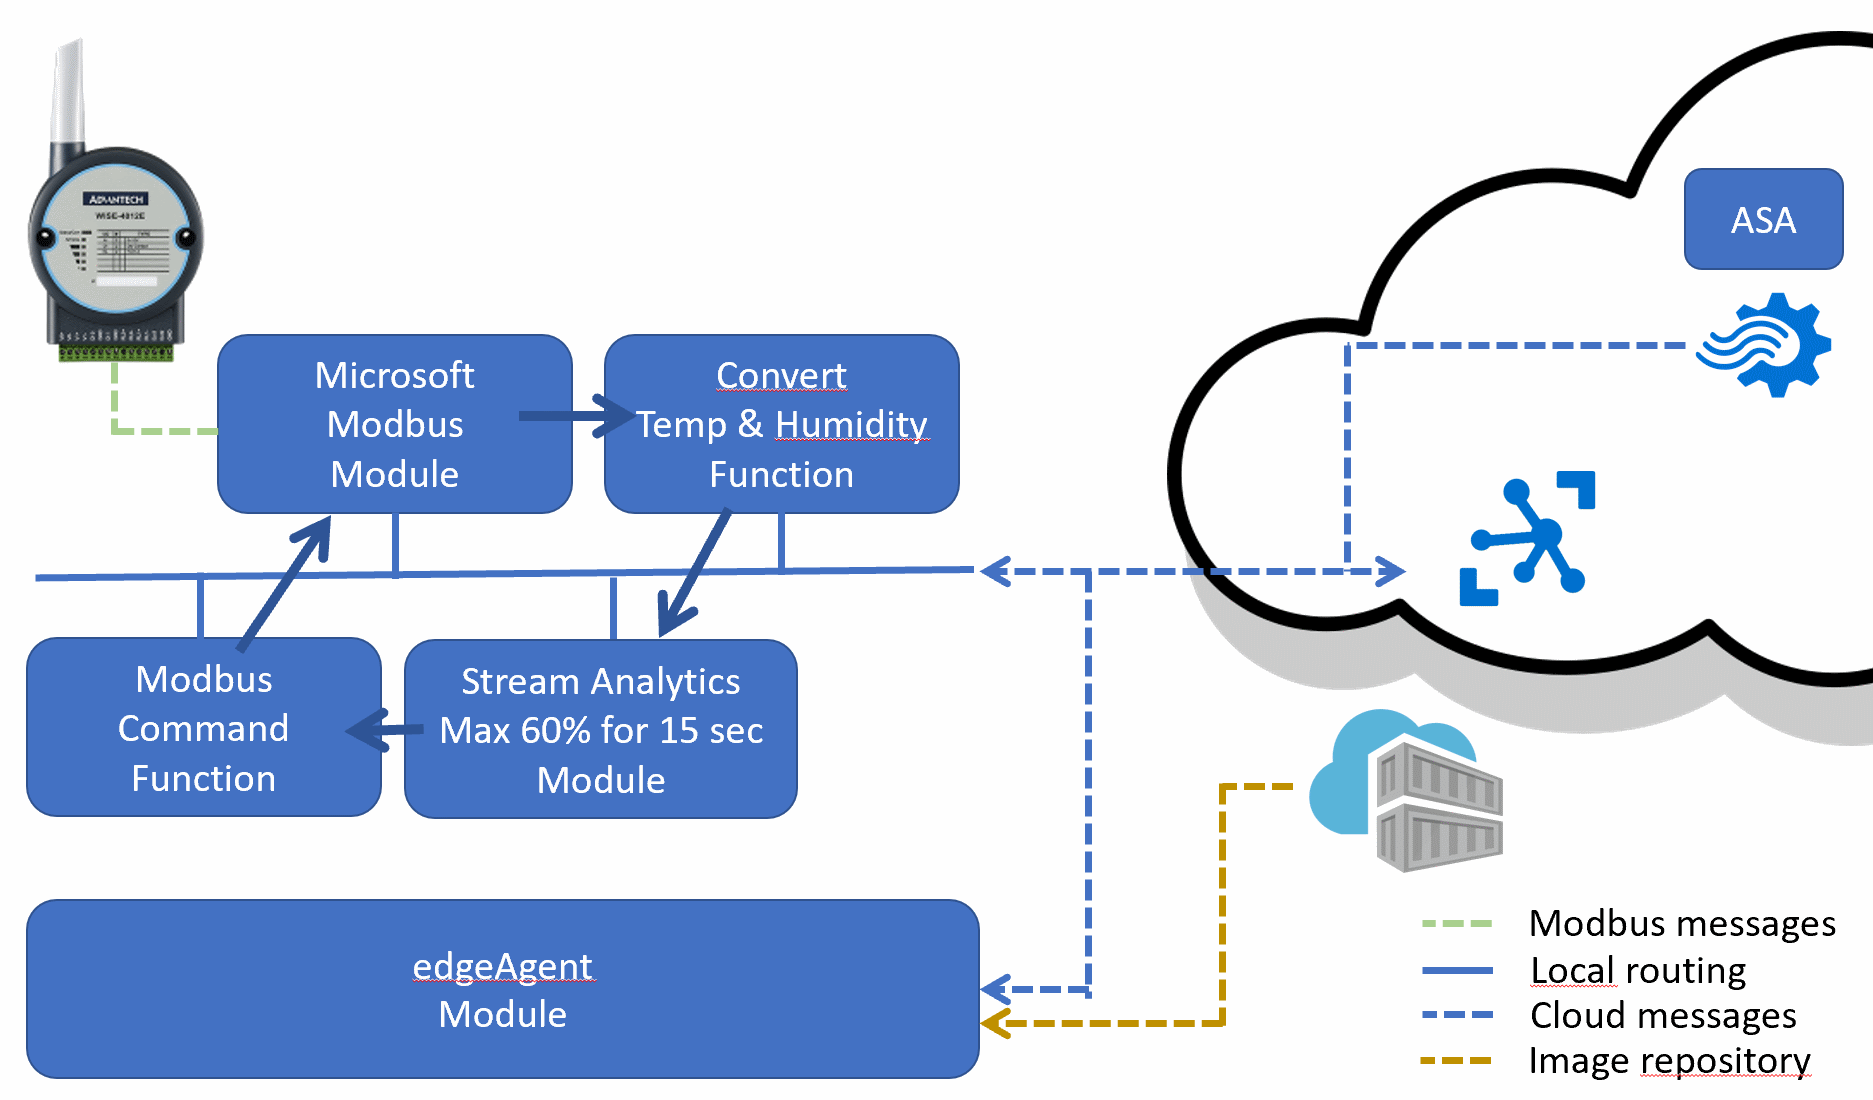
What does it do? The Modbus TCP module provides raw (voltage) data gives access to the two relays. A special function converts these data values into humidity and temperature. Then Stream Analytics is used to look for a situation with high humidity (higher than 60%) but without a fan running. The ASA suggests the action to start the fan. Another prepared function actually starts the fan using commands for Modbus TCP. This is a local feedback loop.
But the measurements are also sent to the cloud, into an Azure Function. So these are the messages I get from the Edge:
{
  "hwId":"Wise4012-155",
  "publishTimestamp":"2018-09-04T21:39:57",
  "relayLed":0,
  "relayFan":1,
  "temperature":24.1580811,
  "humidity":67.45022
}
And I want to show these four measurements in an IoT Dashboard.
Adafruit IO
The Adafruit IO has a free plan which I make use of:
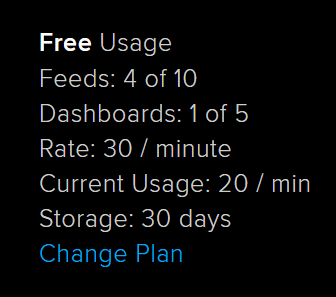
I can receive thirty values a minute. But keep in mind, my original message contains four values so I can only process a complete message every eight seconds.
Yes, I have to split my original message into four separate calls. These are called Feeds in Adafruit IO. This feels like we are very limited but the throttling is not that annoying. Every eight seconds is still good, that is a still one value every two seconds.
And the feedback regarding the throttling is very direct:

So just play with the communication until you have zero throttling errors.
But how do we exchange the messages?
The Adafruit REST API
I checked out several IoT Dashboards recently. Some had their own databases, some were asking for a database to read data from.
But I was looking for an IoT Dashboard which just showed my data. and I only wanted to send my telemetry using Rest.
This is the case with Adafruit IO, great.
The telemetry I receive from the IoTHub triggers an Azure Function. So executing an HTTPS post is quite easy. It then feels like fire-and-forget.
It should help if there was a NuGet package available for C# developers. But we have to program the POST ourselves.
But sending data to Adafruit IO was hard. I tried to communicate using several examples but the documentation was unclear.
How can I send a POST which would be accepted by the Dashboard? Finally, I found the right documentation, this V2 API, which gave away how to communicate using REST:
URL:
https://io.adafruit.com/api/v2/io_username/feeds/io-feed-key/data

HEADER:
'X-AIO-Key: io_key_12345'

BODY:
{
 "value": "string",
 "created_at": "string",
 "lat": "string",
 "lon": "string",
 "ele": "string",
 "epoch": 0
}
This is promising: every IoT device or service can send data to Adafruit IO! Only a REST POST is enough.
When I created an account I got my unique username and a secret activation key (do not share that key).
And I created four feeds (four out of ten free feeds) for these values:
- temperature
- humidity
- led
- fan
In the following example, I only send the temperature to the temperature feed:
#r "Newtonsoft.Json"
#r "Microsoft.ServiceBus"

using Microsoft.ServiceBus.Messaging;
using Newtonsoft.Json;
using System;
using System.Linq;

using System.Text;
using System.Net.Http;
using System.Net.Http.Headers;

public static void Run(EventData myIoTHubMessage, TraceWriter log)
{
  var bodyText = string.Empty;

  using(var stream = myIoTHubMessage.GetBodyStream())
  using(var streamReader = new StreamReader(stream))
  {
    bodyText = streamReader.ReadToEnd();
  }

  dynamic bodyMessage = JsonConvert.DeserializeObject<dynamic>(bodyText);

  // START TEMPERATURE FEED MESSAGE
  var temperatureIoMessage = new IoMessage
  {
    value = bodyMessage.temperature,
    created_at = DateTime.Now.ToString("yyyy-MM-dd HH:mm:ss"),
  };

  SendMessage("temperature", temperatureIoMessage, log);

  // END TEMPERATURE FEED MESSAGE
}

public static void SendMessage(string feed, IoMessage ioMessage, TraceWriter log)
{
  var ioMessageText = JsonConvert.SerializeObject(ioMessage);

  var ADAFRUIT_IO_USERNAME = "[MY ADAFRUIT_IO_USERNAME]";
  var ADAFRUIT_IO_KEY = "[my ADAFRUIT_IO_KEY]";
  var ADAFRUIT_IO_FEED = feed; // this will be the name of the feed the value is sent to
  using (var client = new System.Net.Http.HttpClient())
  {
    client.DefaultRequestHeaders.TryAddWithoutValidation("Content-Type", "application/json");
    client.DefaultRequestHeaders.TryAddWithoutValidation("X-AIO-Key", ADAFRUIT_IO_KEY);

    var response = client.PostAsync(
      $"https://io.adafruit.com/api/v2/{ADAFRUIT_IO_USERNAME}/feeds/{ADAFRUIT_IO_FEED}/data",
        new StringContent(ioMessageText, Encoding.UTF8, "application/json")).Result;

    log.Info($"Adafruit IO responds to {ioMessageText}: {response.IsSuccessStatusCode}");
  }
}

public class IoMessage
{
  public string value {get; set;}
  public string lat {get; set;}
  public string lon {get; set;}
  public string created_at {get; set;}
  public int epoch {get; set;}
}
In the final demo, I send four values using four REST calls:
2018-09-04T22:15:23.787 [Info] Adafruit IO responds to {"value":"57.3510361","lat":null,"lon":null,"created_at":"2018-09-04 22:15:23","epoch":0}: True
2018-09-04T22:15:24.193 [Info] Adafruit IO responds to {"value":"24.1565552","lat":null,"lon":null,"created_at":"2018-09-04 22:15:23","epoch":0}: True
2018-09-04T22:15:24.693 [Info] Adafruit IO responds to {"value":"0","lat":null,"lon":null,"created_at":"2018-09-04 22:15:24","epoch":0}: True
2018-09-04T22:15:25.084 [Info] Adafruit IO responds to {"value":"0","lat":null,"lon":null,"created_at":"2018-09-04 22:15:24","epoch":0}: True
I skipped the Latitude and Longitude and elevation regarding the position of the sensor. But if you want to show a map, Adafruit IO has you covered.
We can see the arrival of all messages in the portal of Adafruit IO using the monitor page:
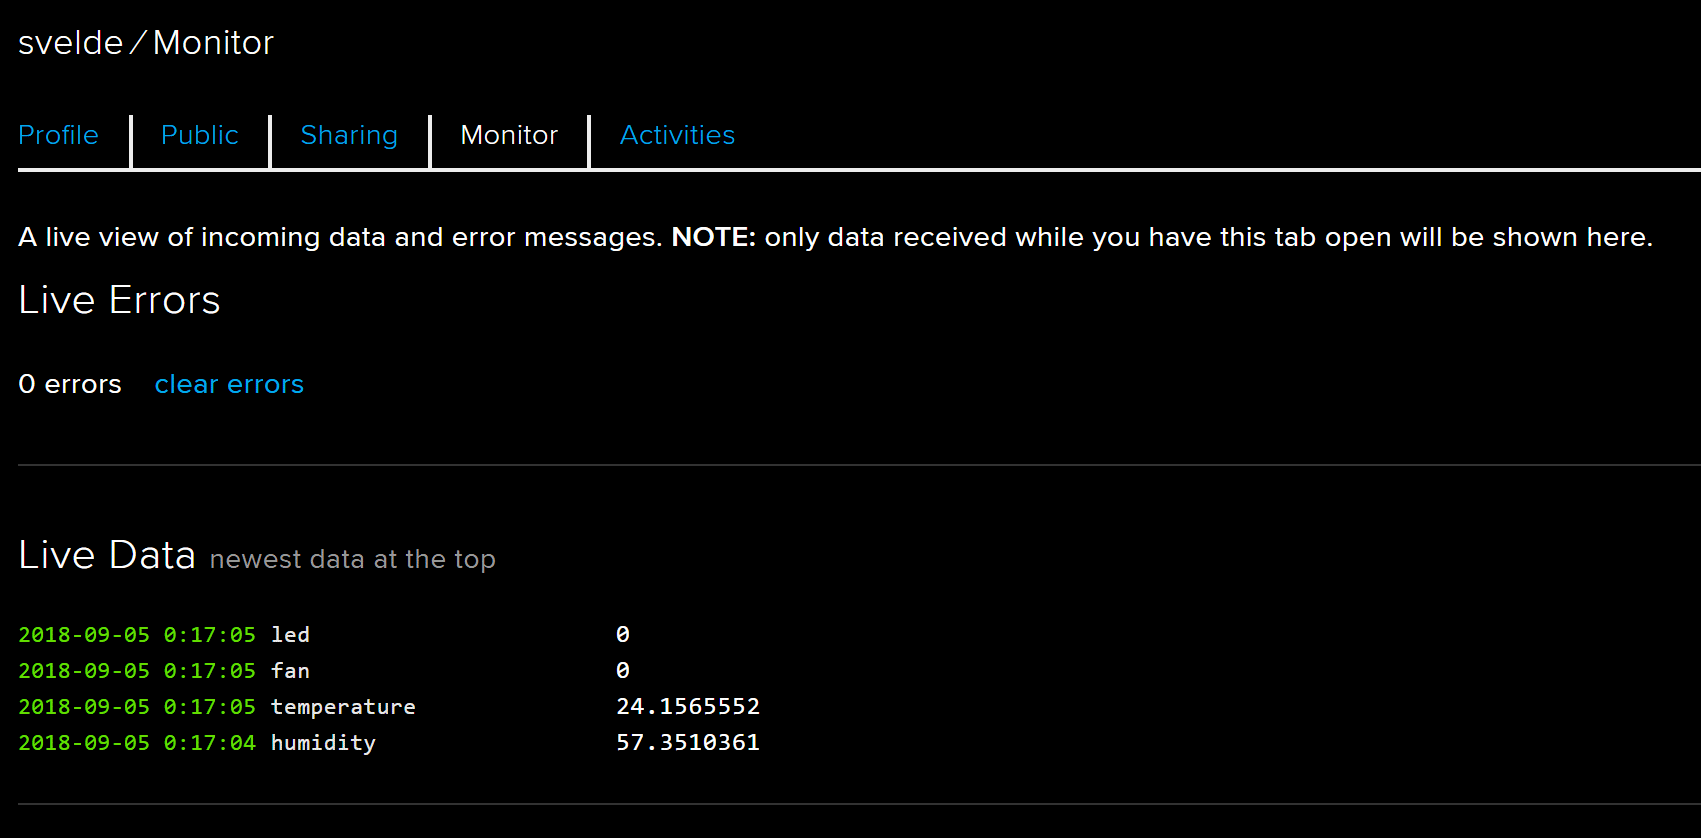
Now, let’s check out the dashboard.
Building a dashboard
As shown already, I defined four different feeds. And the feeds are receiving the values:
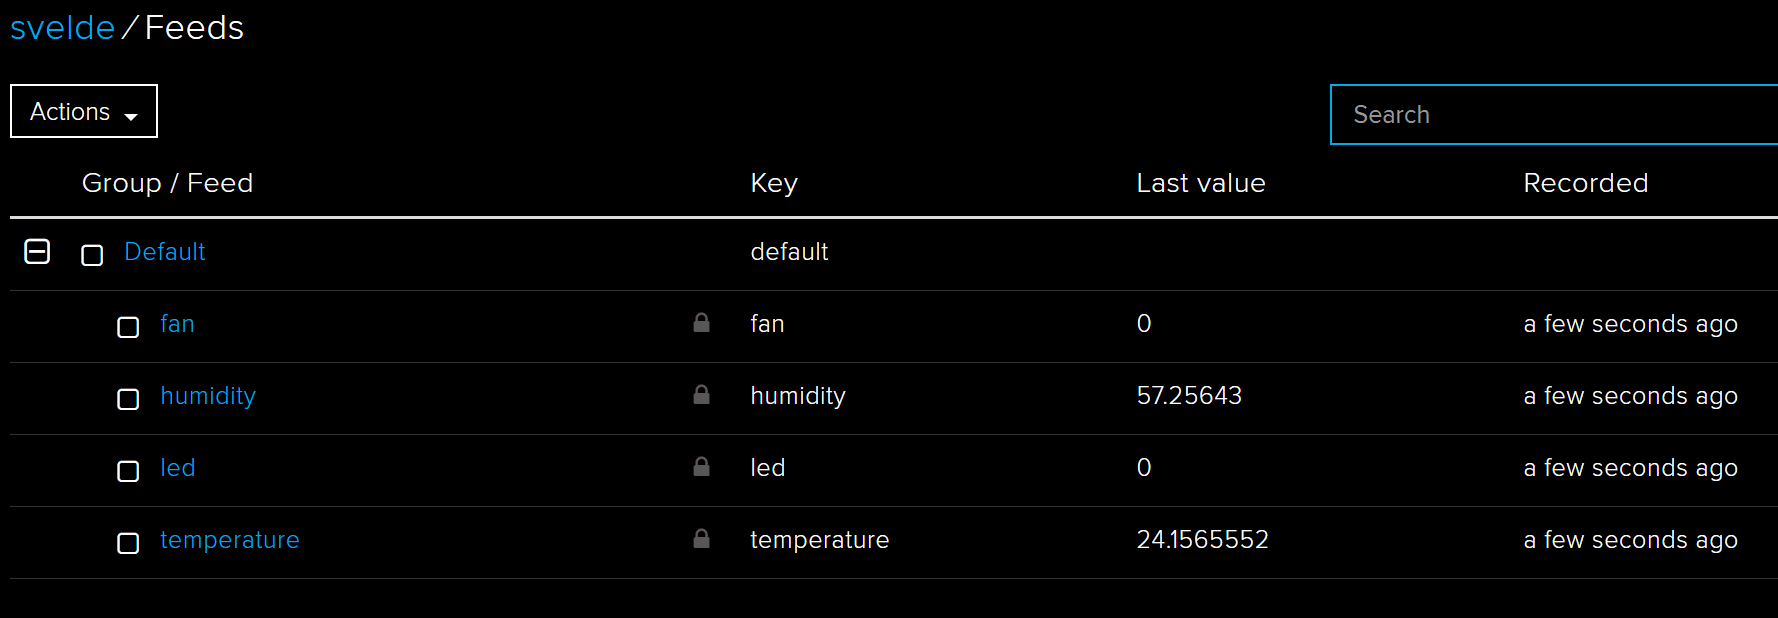
Once the feeds are receiving the data, the dashboard is trivial.
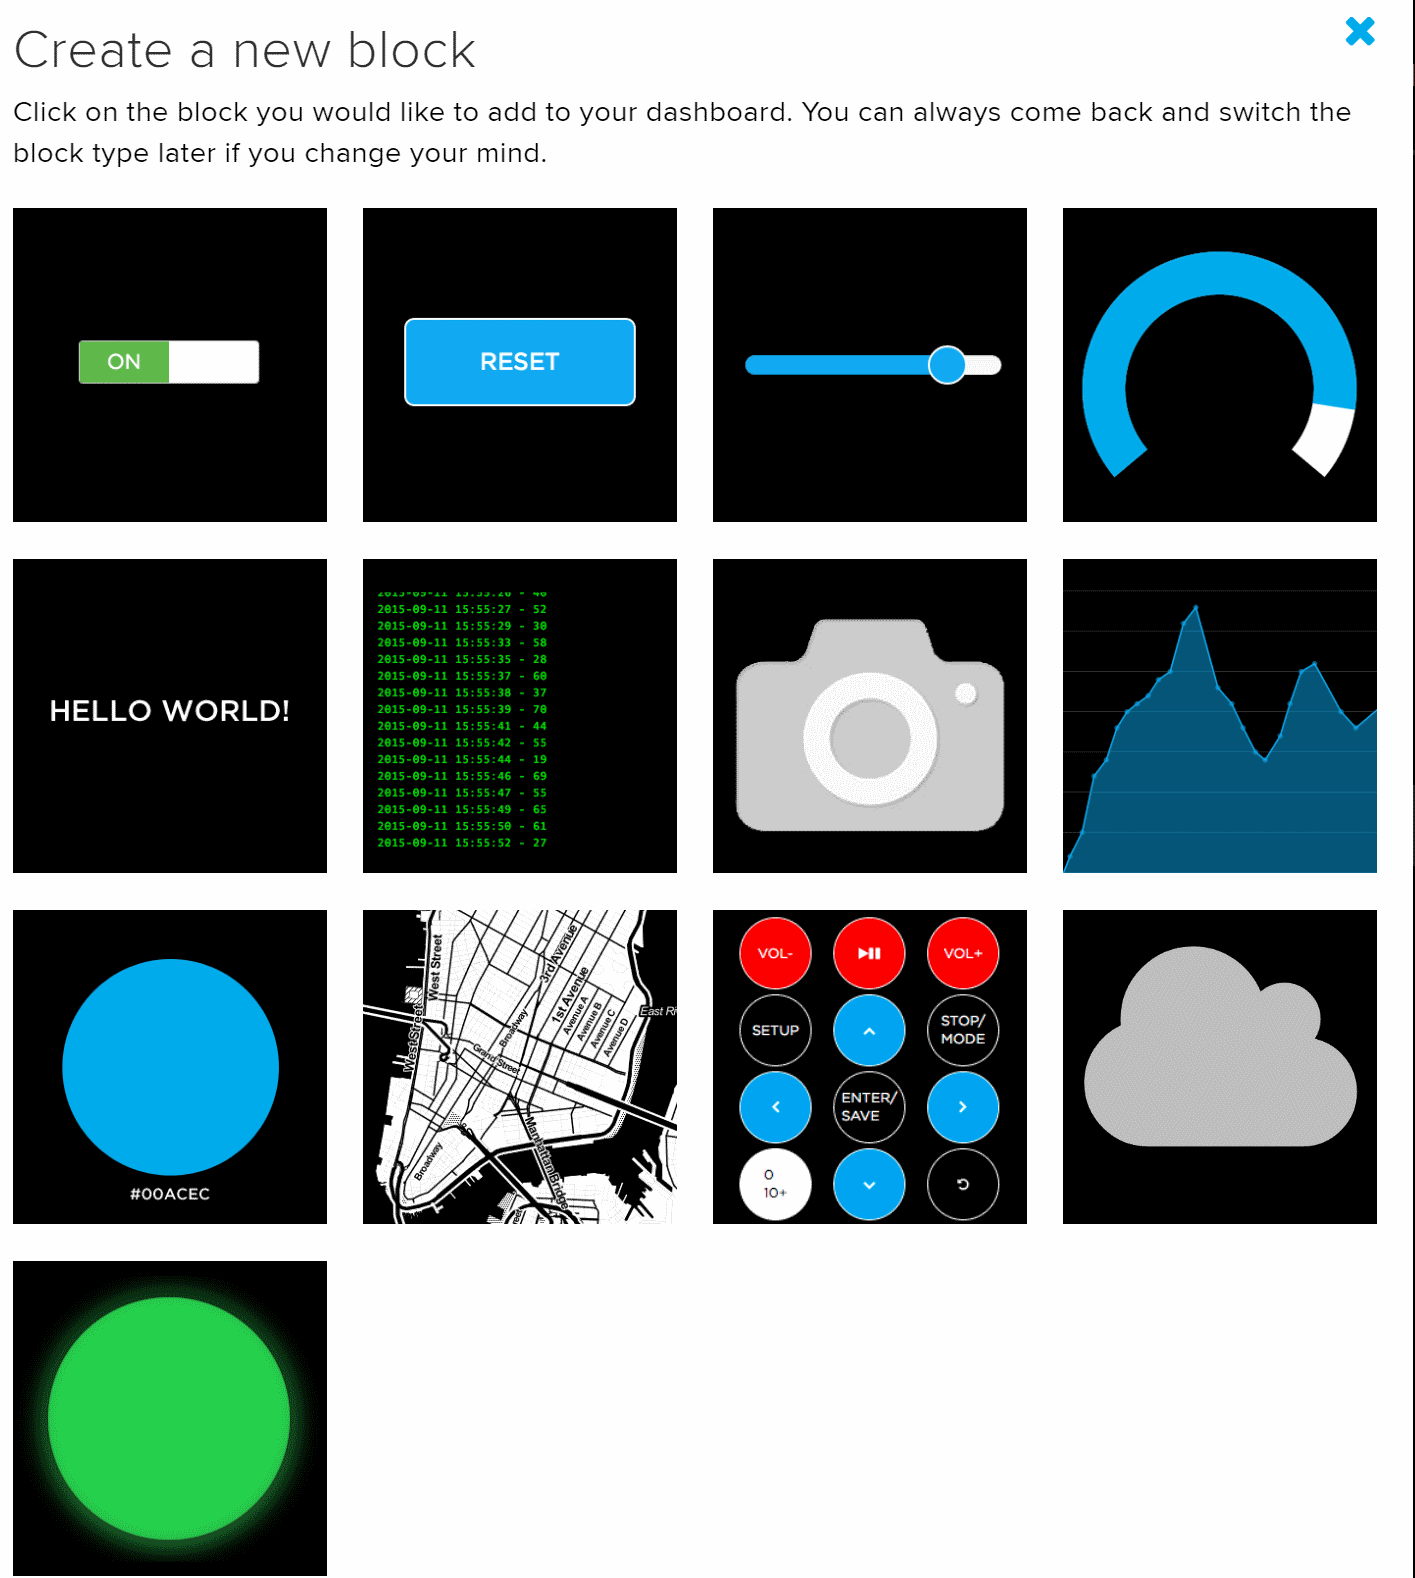
Start a new dashboard and add one or widget at a time. We can select several widgets:
- Toggle
- Momentary button
- Slider
- Gauge
- Text
- Stream
- Line Chart
- Color Picker
- Maps
- Remote control
- Icon
- Indicator
I only played with the representation of telemetry. But some of these widgets feel like these can send commands:
Each widget is related to one or more feeds. For example, my line chart will be reading the temperature and the humidity feed and for the fan and LED feeds I use indicator widgets.
So finally, I was able to create my dashboard:
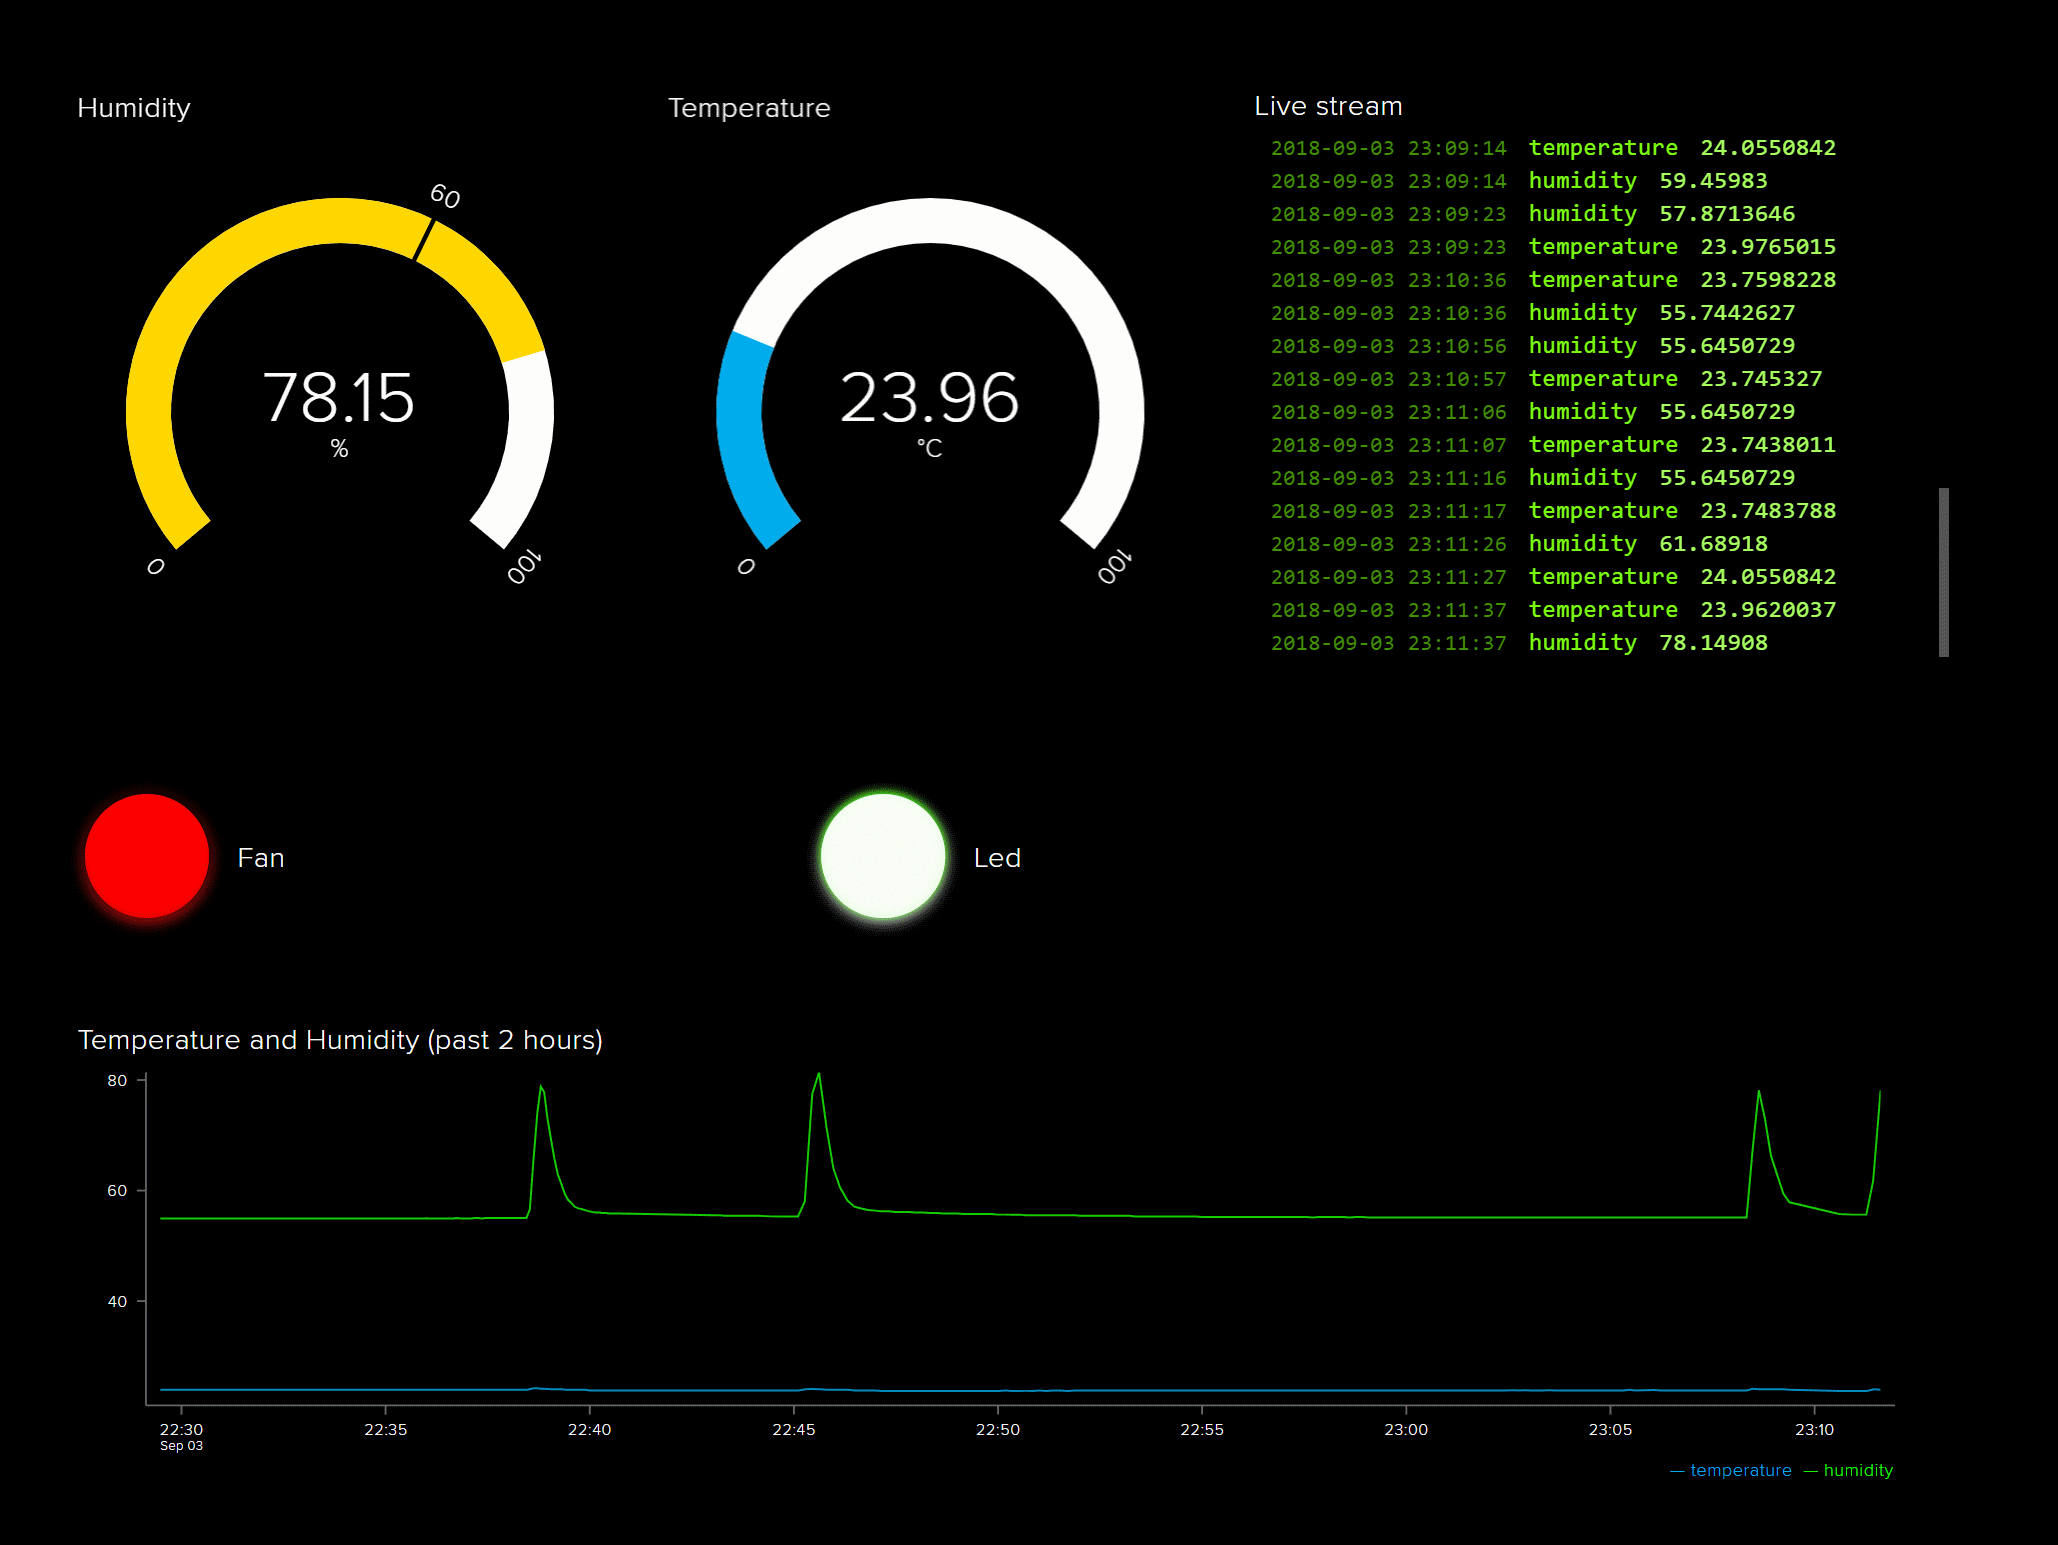
As shown, my dashboard contains the line chart, two gauges, two indicators and a stream component.
Note: You can set the screen in Fullscreen mode. I like this!
Building this dashboard took me less than thirty minutes including the Azure Function code. The throttling was the hard part.
Conclusion
If you need a simple IoT Dashboard, powered by not that much REST data points, just check out Adafruit IO.
There are several other features to check out (like triggers and alarms) but just being capable to show a nice dashboard within a few minutes and still having some control is a great experience.
